protocols_banner_1024x1024.jpg

What is Western Blotting?

Western blotting is a standard biochemical laboratory technique that allows research to detect protein levels in a sample lysate. While a change in protein expression may be a significant research outcome in certain studies (such as for protein-associated diseases), Western blotting is more often conducted in conjunction with other biochemical, functional, or behavioral assays meant to measure response to experimental stimuli.

An Overview of the Western Blot Process

Standard Western blotting is a multi-stage process that can stretch over several hours or days, requiring extensive foresight and planning. Sample proteins are first separated by molecular weight using gel electrophoresis. They are then visualized by probing with multiple antibodies, followed by luminescent or fluorescent detection. Antibodies specific to a protein of interest are allow the technique to be used as a qualitative measure of protein expression. When combined with proper control lysates and antibodies, the technique can be used to perform analytical comparisons between samples.

Most protocols will require some degree of optimization, especially when first working with a new protein of interest. It is best to perform smaller trials before investing in full scale experimentation. Fortunately, once your protocol is established, the technique is highly reproducible under a careful hand, and can be adapted as needed to meet specific study requirements.

Sample Preparation

Homogenized protein is the main substrate of the Western blot protocol. Samples can be isolated from any living organism, including humans, rats, mice, cell culture, or others. Sample preparation includes a series of steps intended to 1) lyse cell membrane and other structures 2) evenly mix protein homogenate throughout the sample and 3) remove lipids and other excess cellular material that may provide a false signal or clog the gel during the electrophoresis step. Most often, a specially formulated lysis buffer, such as RIPA (Radioimmunoprecipitation assay) buffer, is added to the sample extract to assist in the breakdown of cell membranes. Lysis can then be accelerated manually, using physical tools such as a blender, sonication device, or mortar and pestle, though such techniques may be time consuming and somewhat inconsistent across samples. Another option is to perform a fully chemical lysis, which is gentler on the sample but may limit the potential applications later on.

Once the homogenate is obtained, the protein concentration in each sample must be measured to ensure equal starting weights in the final experiment. There are several forms of colorimetric assays that can be performed at this stage:

    • A bicinchoninic acid assay (BCA assay), also known as the Smith assay, is a quick and accurate method for making measurements across a large number of samples. It can be performed in 96-well plates, presuming a 96-well plate reader is available to take the necessary measurements. The assay volume is relatively small, and the incubation time is under an hour.
    • The closely related Bradford assay performs roughly the same function as a BCA assay. This assay uses a spectrophotometer, readily available in most labs, to make measurements after only a short (approx. 5 minute) incubation period.
    • Some researchers may elect to use a NanoDrop or similar device to take protein concentration measurements. While this is a fast, cheap, and quick method for obtaining approximate concentrations, it is not advisable for repeat experiments (higher inter-assay variation resulting from calibration errors) or experiments with large numbers of samples (higher intra-assay variation resulting from residual proteins remaining between sample measurements).

The concentration of the sample is measured in mass (usu. μg)/volume (usu. μL) and will usually be diluted to 1-2.5μg/μL so that a final sample volume of 20μL contains 20-50μg of sample. Again, the exact concentration and weight requires optimization to account for protein availability and gel size. The key requirement is that all samples must contain the same protein weight, allowing for comparison of relative expression at the end of the experiment.

Gel Electrophoresis

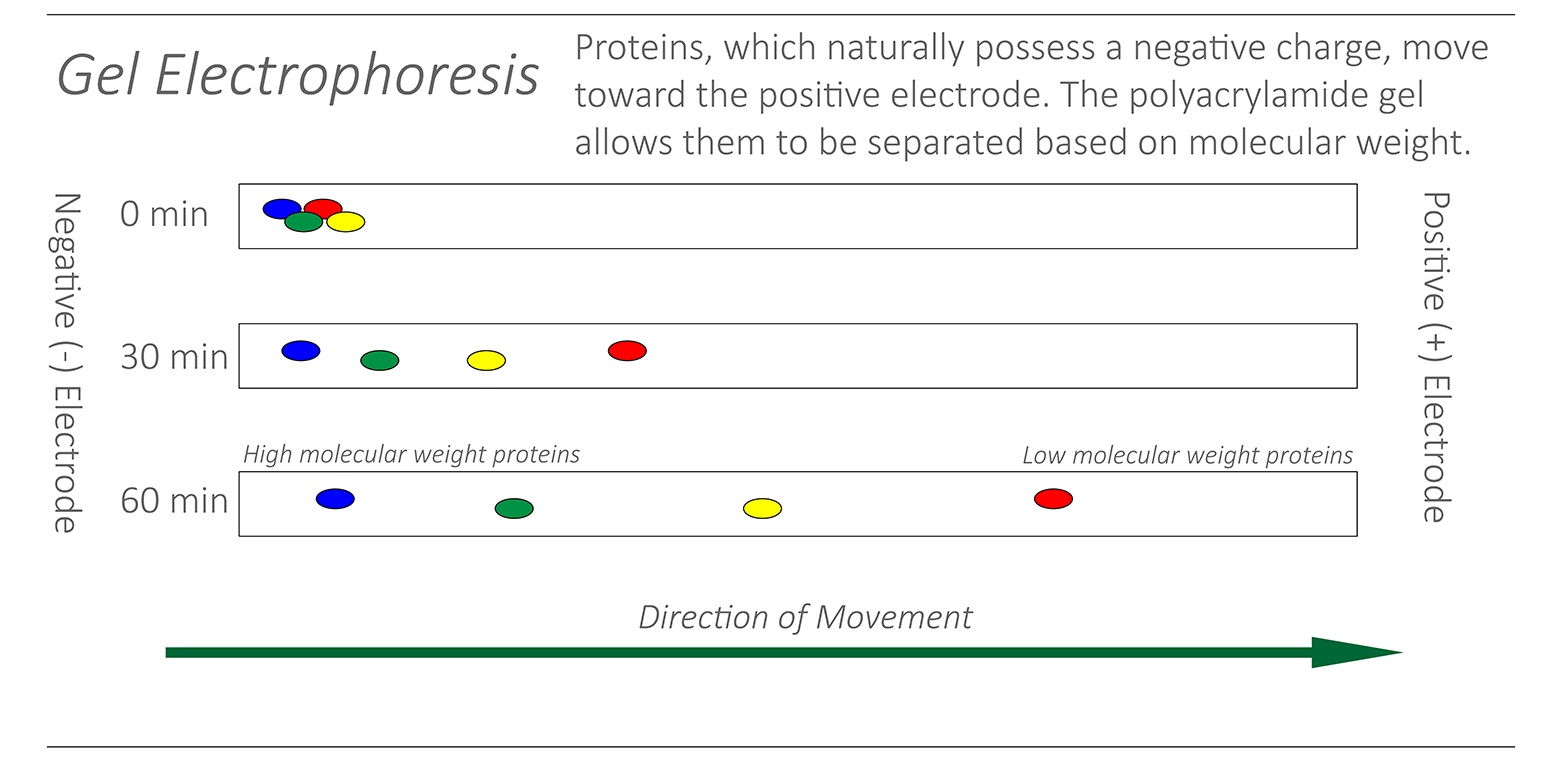
In broad terms, electrophoresis is the process of using electrical current to separate molecules based on size. Proteins, which naturally hold a negative charge (enhanced by the addition of the SDS detergent), move toward a positive charge when a current is applied. Using a polyacrylamide gel, the proteins can be separated based on their molecular weight. The weight can be “read” by examining the protein’s position in the gel: smaller proteins travel further, while larger proteins remain closer to the origin. However, this process only gives a relative weight (“Protein A is heavier than Protein B”). In order to quantify the weight, the samples must be run alongside a ladder, a color-coded solution of proteins of known weights. By comparing the sample’s position relative to these standards, the molecular weight can be estimated.

Read more: How current, voltage, and power settings affect SDS-PAGE

Gel Electrophoresis

Electrophoresis requires the use of buffers (purified water with various ions and other chemicals that stabilize the pH) that permit the free flow of electrical current and the movement of protein through the gel. This is usually accomplished using commercially available Western blot tanks, which support the gel, buffer, and necessary electrodes in the proper formation. Once the tank is assembled, a fixed voltage of 60V is applied until the proteins travel through the stacking layer of the gel. This can be thought of as the “start line” of separation; it allows all proteins in the sample to start from the same position in the gel. After this step, the voltage is increased to 120-150V for anywhere from 30min – 2 hours, depending on the size of the target protein. Since larger proteins move slower, they require more time to separate based on size. Conversely, smaller proteins will separate quickly, and running a gel for too long may result in them running all the way off the end.

(Most power supplies will accommodate fixed current as well as fixed voltage. For SDS-PAGE (Western blot), it is generally acceptable to maintain constant voltage anywhere up to 200V, though it is important to periodically monitor the current, as gels can melt after significant periods at more than 50mA. If high current is observed, lower the voltage accordingly and increase the run time.)

Protein Transfer

The transfer step moves the proteins from the three-dimensional gel to a two-dimensional surface (a membrane), exposing the epitopes to which antibodies will eventually bind. It uses the same principles of electrophoresis, though in this case simply to move all proteins from the gel to the membrane, not to separate or sort. Polyvinylidene fluoride (PVDF) is commonly used as a membrane because of its low reactivity to both chemical and electrical stimulation.

The key step in the transfer process is the assembly of the transfer “sandwich,” which combines the gel, membrane, housing, and supporting materials. Since proteins will move to a positive charge, the membrane is placed between the gel and the positive plate, trapping the proteins on its surface as they exit the gel. Several layers of filter paper and sponges are usually added to either side of the membrane and gel layers to prevent air bubbles from forming between them. All the included layers are held together with a cassette, which is inserted into a transfer housing filled with buffered solution.

Unlike the initial SDS-PAGE step, the goal of the transfer is to run all proteins out of the gel. Thus, low voltage is usually applied over a longer period, anywhere from 3 to 15 hours. However, as with SDS-PAGE, increases in current can melt the gel, which is why the transfer step is usually carried out at 4°C in a fridge or cold room.

Antibody Detection

Antibodies are naturally occurring molecules that help modulate immune response in living organisms by recognizing and marking foreign substances for elimination. They recognize specific protein regions, known as epitopes, that are part of the foreign substance, known as an antigen.

Experimental antibody production is accomplished by 1) inoculating a host animal (such as a mouse, rat, or goat) with an antigen, 2) inducing an immune response, and then 3) harvesting and isolating the antibody from the serum (or, in the case of monoclonal antibodies, isolating B cells that serve as antibody “factories” in cell culture (more below)). In Western blotting, at least two antibodies are used to visually identify each protein of interest:

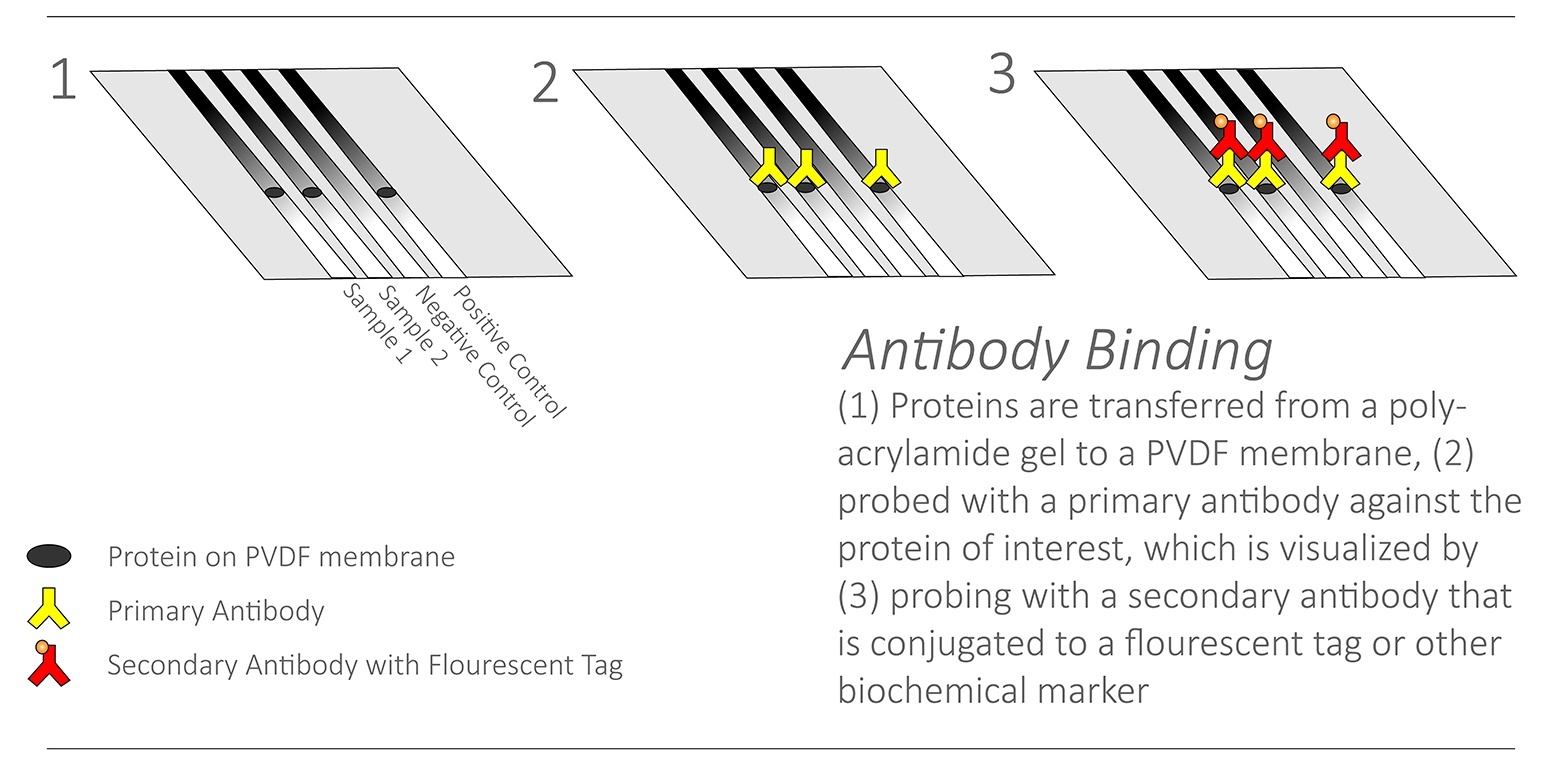
    Primary Antibody: recognizes the target of interest; produced using a host species other than that from which the sample was taken
    Secondary Antibody: recognizes the primary antibody; produced using a host species other than that from which the sample was taken and that from which the primary antibody was taken

Read more: Five Questions to Ask Before Purchasing an Antibody

Antiobdy Binding for Western Blot

If the primary antibody already recognizes the target, what is the purpose of adding another antibody? While the primary antibody detects the target, it is not itself detectable (in most cases). Secondary antibodies are conjugated (i.e. chemically linked) with molecules that allow them to be visualized or imaged experimentally.

The process of exposing a Western blot membrane to the appropriate antibodies is called “incubation.” Prior to the incubation steps, the membrane is soaked in a blocking buffer, such as dried milk in TBS-t. This buffer contains a mixture of proteins and other molecules that occupy high-affinity binding sites on the exposed epitopes, preventing non-specific binding by the primary antibody.

After blocking, the membrane is incubated with primary antibody in solution. The dilution of the antibody is a crucial factor in determining the strength of the signal and in reducing background noise in the final image. Dilutions range from 1:50 to 1:20,000, so it’s important to check the product data sheet for each antibody to ensure proper use.

Developing

Developing is the process that allows visualization of the protein of interest. Usually, this is accomplished through chemical activation of a marker conjugated with the secondary antibody. A common example of one of these markers is HRP (horseradish peroxidase), which when exposed to chemiluminescent substrates, emits light that can be captured on film in a darkroom using a photo developer.

Exposing film to a membrane for varying lengths of time can help visualize signals of different strengths on the same blot. While strong signals may only require a few seconds to appear on the film, weaker signals can require up to an hour or more of exposure. Experimenting with the exposure times is a necessary step in the optimization process.

Alternatively, some secondary (and even primary) antibodies are conjugated to fluorophores that emit light when excited at a certain wavelength. However, this process is most commonly used for flow cytometry and immunofluorescence experiments, and is rarely adapted for Western blotting.